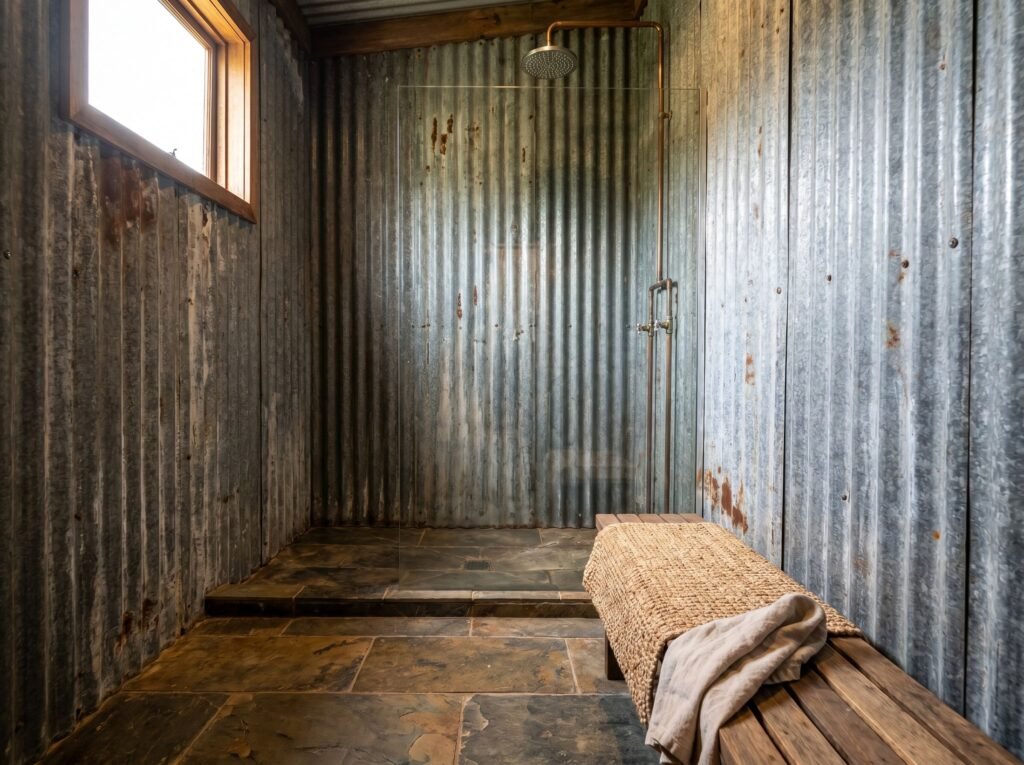
Plain tile is fine. But if you want a bathroom that actually stops people in their tracks, rustic sheet metal shower walls are worth a serious look. Corrugated metal panels — the same material used on farmhouse roofs and warehouse siding — have become one of the most popular ways to add texture, character, and industrial-rustic style to a bathroom remodel.
They’re durable, relatively affordable, and far easier to keep clean than grouted tile. In this guide, you’ll learn which metal types work best, how to install them the right way (including proper waterproofing), design ideas for every style, and how to keep your metal walls looking good for the long haul.
Why Choose Rustic Sheet Metal for Shower Walls?
Metal panels aren’t just a design trend — they solve some real problems that tile creates.
Durability and Longevity
Galvanized steel and aluminum panels hold up under daily exposure to water and steam far better than many people expect. With proper sealing, galvanized corrugated metal can last 15–20 years before the zinc protective coating begins to wear. Aluminum doesn’t corrode at all, making it essentially a permanent installation in wet environments.
Cost vs. Tile Comparison
Corrugated metal roofing panels typically run $0.50–$2.00 per square foot at hardware and farm supply stores — a fraction of what you’d pay for ceramic or stone tile. Labor savings stack on top of that: panels install faster than tile, there’s no grout to mix, and you’re not waiting for adhesive to cure before you can use the shower.
The tradeoff is a slightly higher upfront cost for materials like waterproof membrane and sealer, but the long-term maintenance cost is lower because there’s no grout to regrout, reseal, or scrub for mold.
Aesthetic Appeal
The wavy profile of corrugated metal adds visual depth that flat tile can’t replicate. It pairs naturally with wood, concrete, black fixtures, and stone — which means it works across farmhouse, industrial, modern rustic, and cabin-style bathrooms. It’s also one of those materials that actually looks better as it ages.
Best Types of Sheet Metal for Shower Walls
Not every metal is created equal for wet interior use. Here’s what you need to know before you buy panels.
Galvanized Steel (Most Common)
Galvanized steel is coated in zinc, which provides a first line of defense against rust. It’s the most widely available option — most home improvement stores and farm supply shops sell it in standard 3-foot by 8-foot roofing panels that can be cut to fit your shower dimensions.
The zinc coating does need help in a permanently wet environment. Seal galvanized steel with a clear coat spray or rust inhibitor (Rust-Oleum’s rust inhibitor is a common choice) before installation, and plan to reapply every 2–3 years.
Best for: Shower walls, bathtub surrounds, outdoor shower enclosures. Not recommended for shower floors.
Zinc-Coated Metal (Low Maintenance)
Zinc-coated panels carry a thicker, more uniform zinc layer than standard galvanized steel. The difference matters in a shower: this type resists moisture more aggressively and develops a natural gray patina over time that many people find attractive. It also requires less frequent resealing — typically every 4–5 years rather than every 2–3.
Aluminum (Rust-Proof Option)
Aluminum is the most corrosion-resistant option for shower use. It never rusts, which makes it a smart choice for areas with high humidity or outdoor shower applications where the metal sees sun and rain in addition to water. The downside: aluminum is softer than steel and dents more easily. It also has less visual weight — it won’t look as substantial as galvanized steel.
Quick Comparison
| Metal Type | Rust Risk | Cost | Maintenance | Best Use |
|---|---|---|---|---|
| Galvanized Steel | Low (with sealer) | $ | Re-seal every 2–3 yrs | Indoor shower walls |
| Zinc-Coated | Very Low | $$ | Re-seal every 4–5 yrs | Indoor walls, bathtub surround |
| Aluminum | None | $$ | Minimal | Indoor + outdoor showers |
Is Corrugated Metal Waterproof?
On its own, corrugated metal is not waterproof. The galvanized coating makes it moisture-resistant — meaning it can handle exposure without immediate damage — but water will eventually work its way through any holes, seams, or gaps if you don’t apply a proper waterproof barrier.
To make corrugated metal truly watertight for shower use, you need to apply a waterproof primer or membrane behind and around the panels before installation. A Schluter Kerdi membrane over cement board is the professional-grade approach and the same system used for tiled showers. Without this backing, moisture can reach the wall studs and cause rot, mold, and structural damage over years of use.
As for rust: galvanized steel is naturally rust-resistant but not rust-proof. In a shower that gets heavy daily use, you can expect the protective coating to hold for roughly 10–20 years before visible rust begins to develop. Proper cleaning and periodic re-sealing pushes that timeline toward the longer end.
How to Install Rustic Sheet Metal Shower Walls (Step-by-Step)
This is a manageable weekend DIY project for someone comfortable with basic tools. Budget 1–2 full days for a standard three-wall shower surround.
Tools and Materials You’ll Need
- Corrugated metal panels (measure your shower walls; add 10% for waste)
- Cement backer board or Schluter Kerdi waterproofing membrane
- Stainless steel or coated screws with rubber washers
- Metal shears or jigsaw with metal-cutting blade
- Drill
- Level
- Silicone sealant and caulking gun
- Waterproof primer or clear coat sealer
- Flashing tape
- Cedar or wood trim (for exposed edges)
- Measuring tape, pencil, work gloves
Step 1 — Prepare and Measure
Remove any existing shower wall material down to the studs. Let the area dry completely — any residual moisture behind new panels causes problems later. Measure all three walls carefully and sketch out your panel layout, noting where panels will need to overlap and where you’ll need cutouts for the showerhead and faucet.
Step 2 — Cut the Panels
Mark your measurements on the metal panels and clamp them securely before cutting. Use metal shears for straight cuts and a jigsaw with a metal blade for more complex shapes. Wear work gloves — cut metal edges are razor-sharp. For faucet openings, tin snips give you better control than a saw.
If you want panels to wrap corners rather than butt-joint, contact a local metal fabricator. The bend cost is modest and the result looks far cleaner than exposed raw edges at corners.
Step 3 — Install Waterproof Backing
This is the step most DIY tutorials skip or oversimplify — and it’s the most important one.
Install cement backer board over the wall studs, screwing it in firmly and taping all seams with alkali-resistant mesh tape. Then apply a waterproof membrane (Schluter Kerdi or similar) over the backer board. For professional results, attach wood battens (1¾” × ¾” pressure-treated pine) to the backer board and mount your metal panels to those — the battens create a small drainage gap behind the panels, functioning like a rainscreen if any water gets past the panel seams.
Below the showerhead level, secure battens with Kerdi Fix sealant instead of screws to avoid penetrating the waterproof membrane.
Step 4 — Attach Panels with Rubber-Washered Screws
Starting at the bottom of each wall and working upward, hold the panel against the battens (or directly to cement board) and check level. Mark screw locations at the high points of the corrugation — never in the valleys where water collects.
Fit a rubber washer on each screw before driving it. The washer compresses to form a watertight seal around the screw hole. Use stainless steel or coated screws to prevent rust around the fasteners.
Panels can overlap at seams — the ridged profile makes this easy and the overlap naturally sheds water downward.
Step 5 — Seal All Edges and Seams
Load your caulking gun with silicone sealant and apply a continuous bead along every seam between panels, all four edges of each wall, and anywhere metal meets the floor or shower base. Run a wet finger along each bead to press it into the gap and smooth the surface.
Apply flashing tape at the floor transition to prevent water from wicking under the bottom edge. If you’re using wood trim to cover exposed panel edges at the top and sides, seal behind the trim as well before nailing it in place.
Rustic Sheet Metal Shower Design Ideas
Farmhouse Bathroom Style
Pair galvanized steel walls with natural wood trim, open wood shelving, and a matte black or oil-rubbed bronze showerhead. A teak shower bench, woven baskets for storage, and cotton rope accents complete the look. This is the most popular interpretation of the corrugated metal shower — it brings warmth to what could otherwise feel like a cold, industrial material.
Industrial / Urban Loft Look
Match dark corrugated steel walls with polished concrete floors, exposed black pipe hardware, and a frameless glass enclosure. Keep the palette tight: steel gray, charcoal, and black. This works especially well in lofts or homes with open-plan layouts and high ceilings. The metal walls become a design focal point rather than background texture.
Outdoor Shower Enclosure with Corrugated Metal
Corrugated metal outdoor shower enclosures are one of the best uses of this material — the panels are weather-rated by design, so outdoor use is even more natural than indoor. A simple three-sided enclosure of galvanized or aluminum panels with a gravel or concrete pad below takes a weekend to build and looks intentional rather than improvised. Add a cedar screen or bamboo privacy panel on one side for an outdoor spa feel.
For outdoor builds, aluminum is worth the modest extra cost since it won’t develop surface rust from repeated rain exposure.
Modern Rustic with Glass and Stone
For a bathroom that reads more contemporary than cabin, use corrugated metal on one accent wall only, pairing it with large-format stone tile on the remaining walls and a frameless glass shower door. Polished nickel or chrome fixtures keep the look from feeling too rough-hewn. The metal provides texture; the glass and stone provide polish. It’s an easy way to get the rustic metal look without committing the entire bathroom to it.
Galvanized Tin Shower Walls — Maintenance & Rust Prevention
Cleaning Do’s and Don’ts
Do: Wipe walls down with warm water and mild dish soap. For harder stains or mineral deposits, a paste of baking soda and water applied with a soft sponge works well. Rinse thoroughly and wipe dry after cleaning.
Don’t: Use vinegar — it accelerates rust formation on galvanized steel faster than shower water alone. Avoid bleach and any abrasive cleaners or scrub pads. Stick to pH-neutral cleaners if you want a store-bought product.
After each shower, a quick wipe-down with a squeegee or towel significantly reduces mineral buildup and extends the time between deep cleans.
How Often to Re-Seal
For galvanized steel walls: inspect the clear coat or sealer annually and reapply every 2–3 years. You’ll know it’s time when water stops beading on the surface and starts sheeting flat against the metal. Zinc-coated panels can go 4–5 years between treatments. Aluminum needs no sealing.
Check all silicone seams every 6 months — especially in corners. Reapply sealant anywhere you see gaps forming, before water gets a chance to work behind the panels.
How Long Does Corrugated Metal Last in a Shower?
With proper installation and maintenance, galvanized steel shower walls last 15–20 years before the zinc coating wears away and rust becomes a visible issue. At that point, the underlying steel can still last a lifetime — it’s the coating that fails, not the metal itself. Zinc-coated panels push toward the upper end of that range. Aluminum panels, properly sealed at installation, can last indefinitely.
FAQ
Will corrugated metal rust in the shower?
Yes, eventually — but the timeline is long. Galvanized corrugated metal is rust-resistant by design. With proper sealing and maintenance, most installations hold for 10–20 years before rust becomes noticeable. Regular re-sealing and avoiding harsh chemical cleaners extends the lifespan significantly.
Can I use tin roofing panels for shower walls?
Yes. Standard galvanized roofing panels — the kind sold at farm supply stores — are the most common material for rustic metal shower walls. They’re inexpensive, widely available, and easy to cut to size. The key is proper waterproof backing and edge sealing; the panel itself is the aesthetic layer, not the waterproofing layer.
Can you paint corrugated metal shower walls?
Technically yes — latex enamel-based waterproof paint adheres to metal — but it’s generally not recommended. Painting removes the natural metallic finish that makes these walls visually distinctive, and painted surfaces in a shower are prone to peeling over time. If you want color, consider painted wood trim accents instead.
Is sheet metal safe in a shower?
Yes, with a few caveats. Use rubber-washered screws (not exposed screw heads) to eliminate sharp edges. Round or roll any cut edges before installation. Apply a waterproof primer to eliminate any possibility of heavy metal leaching. Properly installed metal shower walls meet the same safety standards as tile or acrylic — the material is not inherently hazardous in a bathroom environment.
Wrapping Up
Rustic sheet metal shower walls aren’t a compromise — they’re a deliberate design choice that offers real advantages over tile: faster installation, lower maintenance, easier cleaning, and a look that holds up beautifully over time. The key to making them work is taking the waterproofing seriously. Don’t skip the backing membrane, seal every seam, and use rubber-washered screws throughout.
Whether you’re going full farmhouse, outdoor cabin, or modern rustic, corrugated metal panels are flexible enough to pull the look off. Start with one wall if you’re unsure — most people who do come back for the rest.