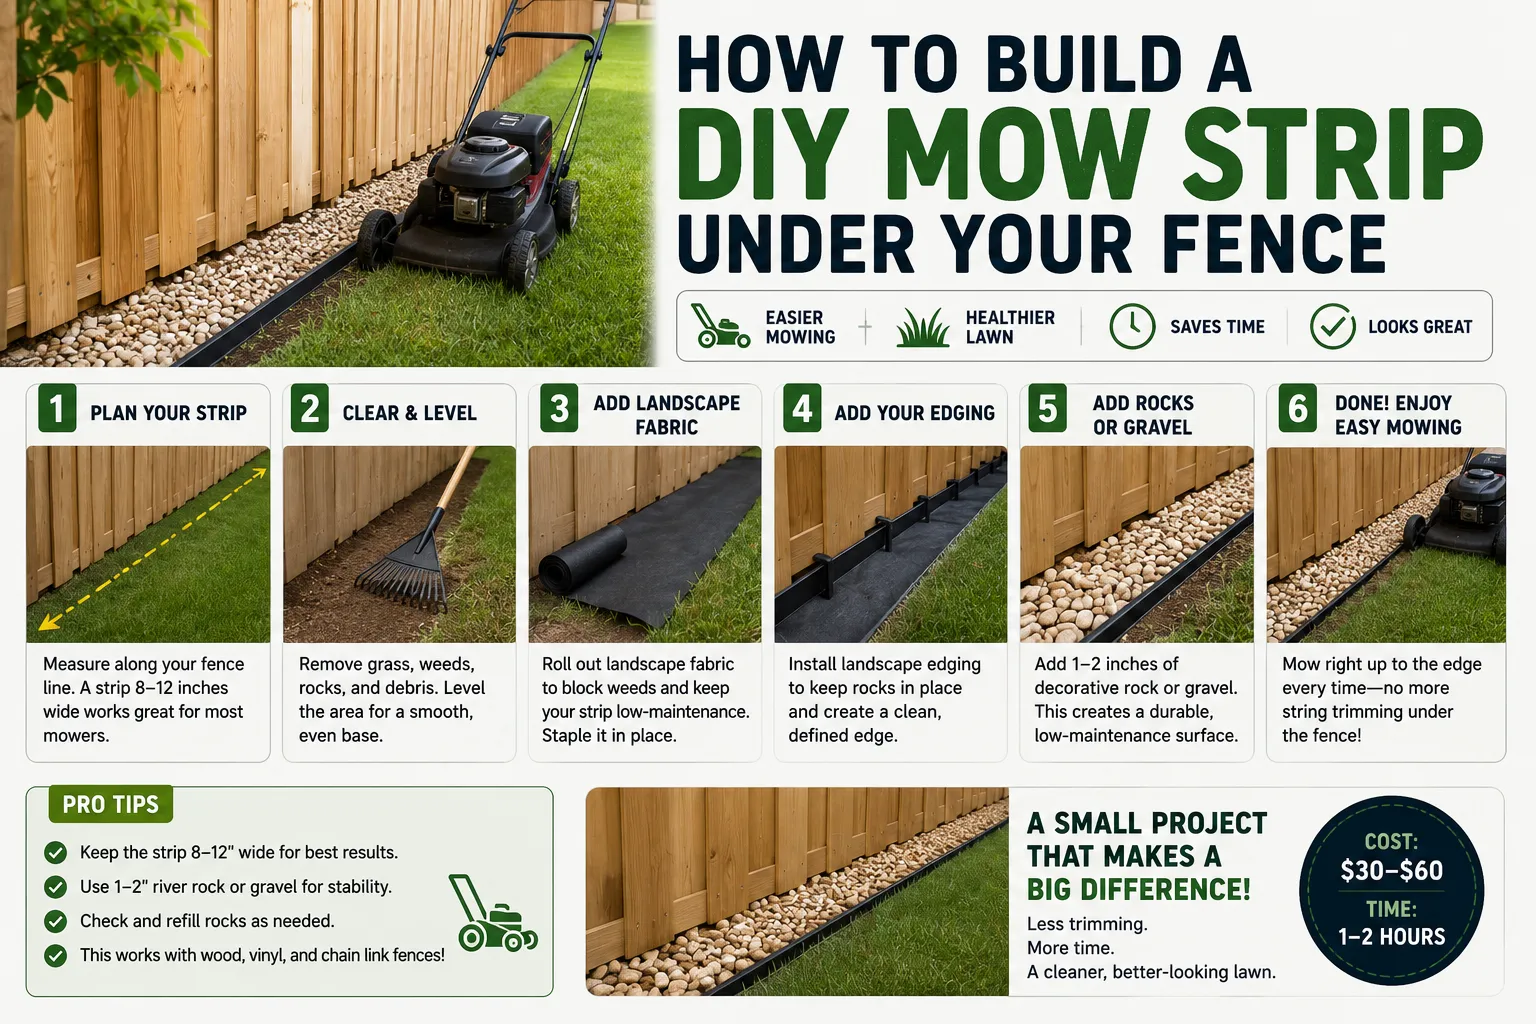
A mow strip is a narrow band of concrete, pavers, or gravel set flush with the ground along the base of a fence. It gives your mower’s wheel a place to ride so the blade reaches all the way to the fence line, no string trimmer required. Most residential strips run 6 to 12 inches wide and 3.5 to 4 inches deep.
That’s the short version. The long version is that a fence line is one of the worst spots in your yard to mow, and most people don’t realize it until they’ve replaced a string trimmer head for the third time this season.
What Is a Mow Strip and Why Put One Under a Fence?
A mow strip does three jobs at once. It stops grass and weeds from growing up against the fence where a mower can’t reach. It keeps your trimmer line away from posts and pickets, which is the number one cause of chewed-up fence bottoms. And if you’ve got a dog that likes to test the perimeter, a buried strip actually stops them, rather than just slowing them down.
Under a fence specifically, a mow strip also protects wood and vinyl fencing from constant ground moisture and mower-blade nicks right at the base — usually where fence rot and cracking start first.
How Wide and Deep Should a Mow Strip Be?
Most mow strips run 6 to 12 inches wide and 3.5 to 4 inches deep. The right number for your yard depends on your mower, and oddly enough, on what your fence is made of.
- 6 inches is the functional minimum. It fits one mower wheel and nothing else — fine for a push mower, tight for anything wider.
- 8 inches is the sweet spot for most homes: comfortable tracking for a standard rotary mower without wasting material.
- 10–12 inches suits a wide-deck or riding mower, and doubles as a narrow walkway along the fence. At this width, add reinforcement — a single run of #3 rebar, or fiber mixed into the concrete, keeps the slab from separating at its cracks.
Depth matters less for looks and more for how long the thing lasts. Go 3.5 to 4 inches for concrete, and dig your trench 4 to 6 inches deep to leave room for a compacted base underneath.
One exception worth knowing before you pick a width: if you’re running Trex, composite, or cedar fencing, keep the strip no wider than the post itself. Those materials expand and contract with temperature more than chain link or standard wood, and a strip wider than the post will eventually crack under that seasonal movement.
Best Materials for a DIY Mow Strip
Concrete gets most of the attention because it lasts the longest. It’s not the only option, and it’s definitely not the cheapest.
| Material | Typical DIY Cost | Install Difficulty | Lifespan | Weed-Blocking |
|---|---|---|---|---|
| Concrete (poured) | $2–$5/linear ft, materials | Moderate–High | 20–30+ years | Excellent |
| Pavers or brick | $10–$20/linear ft, installed | Moderate | 15–25 years | Good |
| Gravel + edging | $0.50–$2/linear ft, materials | Low | 5–10 years | Fair |
| Rubber/plastic/metal edging | $1.50–$4/linear ft, installed | Low | 5–15 years | Poor–Fair |
| HDPE mow strip panel | ~$5/linear ft | Low | 15–20 years | Good |
Concrete wins on lifespan and weed-blocking, full stop. It’s also the most work: forms, mixing, screeding, curing. Gravel is the opposite end — cheapest and fastest, but it needs a fabric underlayment to block weeds at all, and even then, wind-blown seed finds its way into the gaps within a couple of seasons.
Pavers land in the middle. They often cost more than concrete per foot, which surprises people, but they don’t need curing time and a cracked paver is a one-piece swap instead of a jackhammer job. If you’d rather not mix a single bag of concrete, an HDPE panel product gets you most of concrete’s weed-blocking without the forming and pour. You’re trading some lifespan for a Saturday afternoon instead of a weekend.
What Does a DIY Mow Strip Cost?
For a typical 50-foot run at 8 inches wide and 4 inches deep, bagged concrete materials (including forms and base) run roughly $100 to $250 {{VERIFY}}. Add another $30 to $60 if you don’t already own a float, edger, and jointing tool. Hire it out instead and the math changes: contractors typically price small flatwork like this at $8 to $15 per linear foot, but many apply a minimum job charge of $800 to $1,500 regardless of exact footage, since a 50-foot mow strip usually isn’t worth a separate trip at the per-foot rate alone {{VERIFY}}.
Rather than eyeballing the concrete math — an 8-inch by 4-inch strip uses about 0.022 cubic yards per linear foot, which isn’t a number anyone keeps in their head — plug your strip’s length, width, and depth into our Concrete Price Calculator. It converts straight to cubic yards and bag count, so you know exactly how many 80-lb bags to load into the cart before you’re standing in the aisle doing math on your phone.
[EMBED: Concrete Price Calculator widget]
How to Install a Mow Strip While Building a New Fence
Building the strip alongside a new fence is the easier of the two jobs. You’re not excavating around anything that’s already load-bearing.
- Mark your width before you dig anything. Use the fence-type guidance above to pick 6, 8, or 12 inches, and mark the line with spray paint or a taut string.
- Set fence posts first, dig the strip trench second. Let post concrete cure per the fence manufacturer’s timeline before you trench next to it — digging too soon can shift a post that hasn’t set.
- Trench 4 to 6 inches deep at full strip width. Pull every root you find. A missed root is the single most common reason a DIY strip heaves within its first year.
- Set forms 2 inches wider than the fence line. 1×4 lumber staked every 3 to 4 feet works fine for straight runs. That small overhang keeps the mower wheel from ever catching the post itself.
- Add base material and reinforcement. Compact a gravel base, and if you’re going 10 to 12 inches wide or working in clay soil, lay a single run of #3 rebar before you pour.
- Pour, screed, and pitch away from the fence. Slope the surface about 1/8 to 1/4 inch across its width so water runs off the strip instead of pooling at the post base.
- Cut control joints and cure. Tool a joint every 4 to 6 feet, about a quarter of the slab’s depth. Keep it damp for 3 to 7 days, and hold off mowing over it for a full week.
One thing worth doing while the trench is open and nothing’s built yet: if you’re planning path or landscape lighting along that fence line eventually, sleeve a length of PVC conduit under the strip now. Digging it up later to add wiring is a much bigger job than laying a $10 pipe today. If lighting’s on the list, our General Lighting Calculator can help you plan fixture spacing before you decide how much conduit to bury.
How to Install a Mow Strip Under an Existing Fence
This is the version most people actually need, and it’s the one almost nobody online walks you through — because you’re excavating right next to posts that are already carrying a fence.
- Work in short sections, not the full run at once. Dig 3 to 4 feet at a time. Trenching the entire length in one pass is how you undermine a footing you didn’t mean to touch.
- Hand-dig within 6 inches of every post. Once you’re close, put the power auger or trencher away. A shovel and a trenching spade are slower, but a machine is how existing footings crack.
- Lean toward pavers or gravel near posts, concrete everywhere else. A full concrete pour tight against an existing footing risks bonding to it in ways that transmit stress back and forth as the ground moves. Pavers or a gravel-and-edging combo let you retrofit without that risk.
- Butt the material to the post — don’t bond it. Leave a small gap, or run a flexible sealant where the strip meets the post, so seasonal ground movement doesn’t crack your new strip against something that isn’t moving with it.
Chain Link
Chain link is the easiest retrofit by a wide margin. Posts sit in individual footings spaced further apart than a wood or vinyl fence, which leaves more open trench to work in between and less post to dig carefully around. The mesh itself doesn’t need special treatment — just make sure the strip sits flush so the bottom of the mesh isn’t digging into loose soil.
Wood Privacy or Picket
Check what’s already around the post before you dig. Older wood fences often have a gravel or concrete collar buried at the base that isn’t obvious until your shovel hits it. Watch your depth against the bottom rail, too: most privacy fences are built with a few inches of clearance between the bottom rail and the ground specifically to keep wood off wet soil. Bring your strip up too high and you erase that gap, trading one rot problem for another.
Vinyl
Vinyl posts are hollow and set in a smaller concrete footing than wood, but the real issue is the same one CFC Fences & Decks flags for composite fencing: vinyl expands and contracts more than wood or chain link with temperature swings. Keep the strip no wider than the post face, and put a flexible expansion joint where the two meet. Skip that step and hairline cracks tend to radiate out from the post within a season or two.
Will a Mow Strip Stop Weeds — and Keep Dogs From Digging?
A solid material stops weeds far better than gravel does. Concrete, tightly fitted pavers, and interlocking HDPE panels all form a continuous barrier; gravel needs a fabric underlayment just to compete, and even then, wind-blown seed germinates in the gaps between stones within a couple of seasons. If you want to know exactly what’s growing back before deciding how hard to fight it, Cornell’s Turfgrass and Landscape Weed ID tool is a free, genuinely useful resource for narrowing it down.
On the digging question: a strip buried 4 to 6 inches deep is a real barrier. Most dogs dig along a fence line because they can feel or see a gap to the other side at ground level, so the digging tends to be targeted at that one spot rather than scattered across the yard. Remove the gap and most dogs give up within their first few attempts, though a truly determined digger can still work around the ends of a strip that doesn’t run the full fence length.
Preventing Cracks and Long-Term Maintenance
Some hairline cracking in a concrete mow strip is normal, especially through a freeze-thaw winter. Control joints don’t prevent cracking — nothing outside a structural footing does — they just decide where the crack happens instead of leaving it to chance. Space them every 4 to 6 feet and you’ll rarely notice the cracks that do form.
Beyond that, maintenance is minor. Reseal every few years if you want to keep the color from fading. Keep an eye on nearby tree roots, which can lift a strip from underneath over several years no matter how well you built it. And if a section does crack badly, a concrete or paver strip is a patch job, not a full teardown — you’re replacing a few feet, not the whole run.
FAQ
How wide should a mow strip be?
Most residential mow strips run 6 to 12 inches. Six inches is the functional minimum for one mower wheel; 8 inches works for most homes; go 10 to 12 inches if you run a wide-deck or riding mower.
Can I install a mow strip after the fence is already built?
Yes. It’s more work than building it alongside a new fence, since you’re excavating around existing footings, but it’s a standard retrofit. Work in short sections, hand-dig near posts, and follow the retrofit steps above for your specific fence type.
Does a concrete mow strip need rebar?
Not always. It’s optional on a 6- to 8-inch strip. On 10- to 12-inch widths, or if you’re working in heavy clay soil, a single run of #3 rebar (or fiber mixed into the concrete) is cheap insurance against the slab separating at its cracks.
What’s the cheapest DIY mow strip material?
Gravel with a fabric underlayment and basic edging is the least expensive option up front, though it needs replenishing every few years and blocks weeds less effectively than a solid material.
Will it crack in freezing weather?
Some hairline cracking is normal in freeze-thaw climates. Properly spaced control joints won’t stop it entirely, but they control where it happens, so the strip stays functional and mostly invisible even after a few winters.