
Roofing Basics: Parts, Types, Materials & Costs

Roofing Basics

“Roofing basics” covers the parts, styles, and materials that make up a residential roof, along with how to judge its condition, estimate cost, and know when to call a professional. The frame is rafters or trusses topped with decking. Underlayment and a finish material (shingles, metal, tile) form the weather barrier. Pitch, flashing, and ventilation decide how long the whole system lasts.

That’s the one-paragraph version. Below is the long one: anatomy, styles, materials, cost, and the checklist you’d want before signing a contract with anyone.

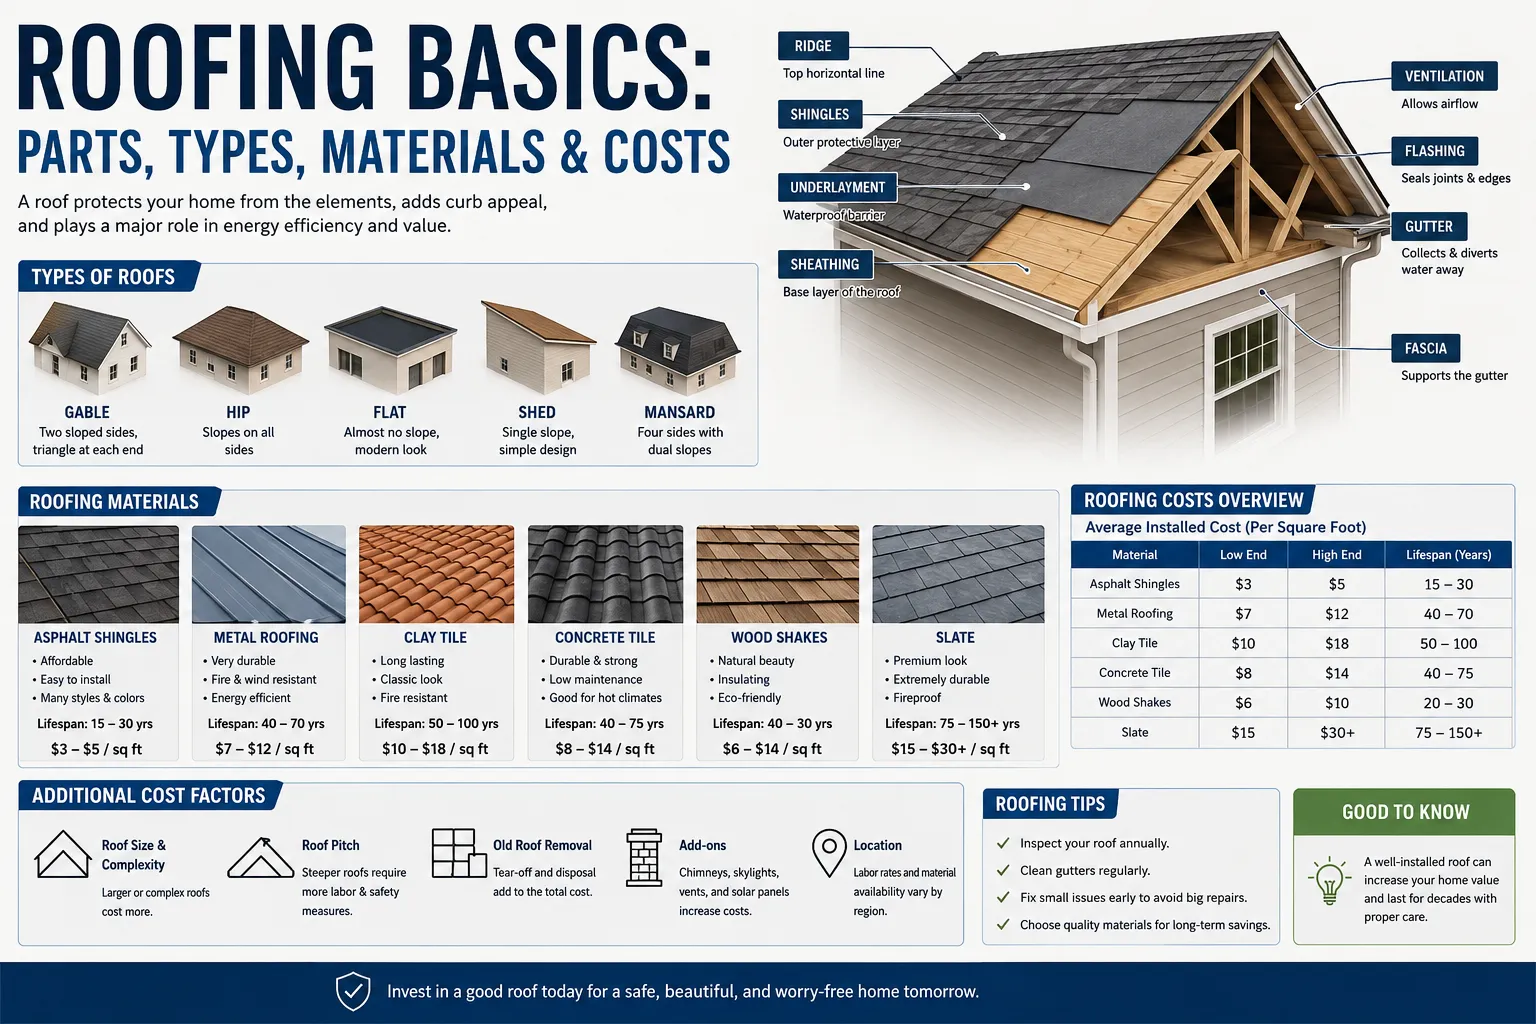
Roof Anatomy: The Parts of a Roof, Visualized

Most roofing quotes and inspection reports assume you already know this vocabulary. Here’s the diagram most contractor sites skip, followed by what each part actually does.

Roof Anatomy: The Parts of a Roof Cross-section (left) and hip-roof plan view (right) Attic space Ridge Dormer Flashing (at chimney) Drip edge Fascia Gutter Soffit Eave Shingles Underlayment Decking Rafters Wall (exterior) Roof plan view (hip roof, from above) Ridge Hip Valley Shingles / roof covering Underlayment Decking (sheathing) Rafters / trusses Flashing Gutter / downspout Valley (dashed = roof plan lines) toolcalcpro.com — for reference only; consult local code for structural specifics.

Rafters and Trusses

These are the skeleton. Rafters are individual angled beams cut and installed on site; trusses are pre-built triangular frames trucked in as a unit. Trusses went mainstream in the 1960s because they’re faster to install and use less lumber. Most production homes built after that use them.

Decking (Sheathing)

Plywood or OSB panels nailed across the rafters or trusses. This is the surface everything else attaches to. Soft, spongy decking under your feet during an inspection is a bigger red flag than worn shingles. It usually means water’s been getting in for a while.

Underlayment

A water-resistant layer stapled or nailed directly to the decking, under the shingles. Think of it as the backup plan for when wind-driven rain gets past the shingles themselves, which happens more than you’d think.

Flashing

Thin metal (usually aluminum, steel, or copper) installed anywhere the roof plane is interrupted: chimneys, skylights, vent pipes, walls. Flashing failures cause a disproportionate share of “mystery leaks,” because the surrounding shingles look fine while the seal underneath has failed.

Drip Edge

A metal strip along the eaves and rakes that directs water away from the fascia and into the gutters instead of behind them. Skipping it is one of the most common corner-cuts on cheap re-roofs, and it’s the reason some fascia boards rot within a few years.

Ridge

The horizontal peak where two roof planes meet at the top. On most homes this is also where ridge ventilation gets installed.

Valley

The internal angle where two roof planes meet and funnel water downward. It’s the opposite of a ridge, and it sees more water volume than any other section of roof, which is why valley flashing and shingle overlap matter more here than anywhere else.

Hip

An external angle where two roof planes meet, sloping away from each other (common on hip and dutch-hip roofs). Structurally, hips shed wind better than a gable end, which is one reason hip roofs show up more often in hurricane-prone regions.

Eaves

The lower edge of the roof that overhangs the exterior wall. Eave length affects both drainage and how much shade your walls and windows get in summer.

Soffit and Fascia

Soffit is the underside of the eave (often vented); fascia is the vertical board that caps the rafter ends and holds the gutters. Rot here is usually a symptom of a drip edge or ventilation problem upstream, not a standalone fascia issue.

Dormers

A vertical, roofed structure that projects from a sloped roof, usually housing a window. Every dormer adds roof-to-wall intersections. More of those means more flashing seams, and more places for a leak to start.

Common Roof Types and Styles

Roof style affects drainage, attic space, and wind performance. It also affects cost, since style changes total surface area and complexity. Here’s how the main styles compare.

StyleShapeDrainageBest For
GableTwo sloped sides meeting at a ridge, triangular endsGood, but end walls are exposed to windMost climates; simplest and cheapest to build
HipFour sloped sides meeting at a ridge or pointExcellentHigh-wind and hurricane-prone regions
Dutch HipHip with a small gable at the peakExcellentAdds attic ventilation to a hip roof’s wind resistance
GambrelTwo slopes per side, steeper below, shallower above (barn-style)GoodMaximizing usable attic/loft space
MansardFour sloped sides, nearly vertical lower slope, flat or low-slope topGood, but complex flashingAdding a full upper floor without raising the roofline
Skillion (Shed)Single flat plane at an angleDepends entirely on pitchAdditions, modern builds, garages
FlatNearly level, with slight slope for drainageRequires membrane systems, not shinglesCommercial buildings, modern residential, additions

Roofing Materials Compared (With Lifespan)

Material choice drives most of what a roof costs, both up front and over its lifetime.

$–$

MaterialAvg. LifespanRelative CostBest For
3-Tab Asphalt Shingles15–20 years$Budget re-roofs, rental properties
Architectural Asphalt Shingles25–30 years$$Most single-family homes (current default choice)
Metal (standing seam/panel)40–70 years$$$$Long-term owners, wildfire-prone areas, steep pitches
Wood Shake20–30 years$$$Historic or rustic-style homes (check local fire codes first)
Slate75–100+ yearsHistoric homes, buyers who plan to never do this again
Clay or Concrete Tile50–100 years$$$$Hot, dry climates (Southwest, coastal Southeast)
Composite/Synthetic30–50 years$$$Homeowners who want a slate or shake look at a lower weight and cost
TPO / PVC / EPDM (flat membrane)20–30 yearsFlat and low-slope roofs only

Asphalt still covers the large majority of U.S. residential roofs, mostly because it’s the only category that’s cheap, fast to install, and available from nearly every contractor. Metal has been the fastest-growing category over the past decade, largely on longevity and insurance incentives in wildfire and hail zones.

Understanding Roof Pitch & Slope

Pitch is written as a ratio, like 6/12, 8/12, or 10/12. It means the roof rises that many inches for every 12 inches of horizontal run. A 6/12 roof climbs 6 inches for every foot you move toward the ridge. Low-slope roofs run roughly 2/12 to 4/12; steep-slope starts around 7/12 and up.

Pitch isn’t cosmetic. It determines which materials you’re allowed to use (most shingle manufacturers won’t warranty a roof under 2/12–4/12, because water doesn’t shed fast enough), how much a roofer will charge for the same square footage of ground-plan area (steeper roofs take longer and need more safety gear), and how much actual material you need. A steep roof has more surface area than its footprint suggests.

Roof Ventilation and Fire Ratings

Why Ventilation Matters

An attic without enough airflow traps summer heat against the underside of the decking, which shortens shingle life from the inside. In cold climates, the same lack of airflow lets warm indoor air melt roof snow unevenly, creating ice dams that back water up under the shingles. Most manufacturer warranties actually require a minimum level of ventilation to stay valid. A lot of homeowners find that out only after a claim gets denied.

Common vent types: ridge vents (run the length of the peak), soffit vents (intake, low on the eave), gable vents, powered attic fans, and off-ridge/box vents. The best-performing setup pairs continuous ridge venting with continuous soffit intake, so air actually flows from low to high instead of just sitting in the attic.

Fire Ratings

Roofing materials carry a Class A, B, or C fire rating based on standardized testing (ASTM E108 / UL 790). Class A offers the highest resistance to fire exposure and is required or strongly recommended in many wildfire-prone jurisdictions; most metal, tile, and slate roofs qualify, and asphalt shingles typically achieve Class A when installed over compliant underlayment. Check the manufacturer spec, though, not just the material category.

Signs Your Roof Needs Repair or Replacement

Age is the first filter. But a roof’s condition matters more than its birthday.

  • Granules in the gutters: asphalt shingles shed protective granules as they age; heavy buildup signals the shingles are past their functional life
  • Curling or cupping shingle edges: a sign of age, heat damage, or ventilation problems
  • Daylight through the attic roof boards: check on a sunny day with the attic light off
  • Sagging roof deck: often structural, not cosmetic; get this looked at quickly
  • Missing or cracked shingles after a storm: isolated damage is usually repairable; widespread damage usually isn’t
  • Moss or algae streaking: cosmetic at first, but moss holds moisture against the roof surface over time
SignalUsually MeansRepair or Replace?
A few missing shingles, roof under 15 years oldIsolated wind or impact damageRepair
Granule loss across most of the roofShingles at end of lifeReplace
One active leak, roof under 10 years oldFlashing or vent-boot failureRepair
Multiple leaks, visible saggingWidespread deck or structural issueReplace
Roof over 20 years old (asphalt)Approaching or past expected lifespanReplace, even if it “looks fine”

How to Inspect Your Roof (DIY Checklist)

Skip the ladder for this one. Most of what you need to see is visible from the ground with binoculars, or from inside the attic.

Safety note: don’t walk a roof yourself unless you’re experienced with fall protection. Most residential roof injuries happen during casual inspections, not professional work.

  • From the ground: look for missing, curling, or discolored shingles; sagging ridgelines; damaged flashing around chimneys and vents
  • In the attic: check for daylight, water stains on the underside of the decking, and damp or matted insulation
  • Gutters: check for granules (asphalt shingles shedding) and confirm they’re draining away from the foundation
  • After any hailstorm or major wind event: photograph visible damage immediately, even minor-looking dents, for insurance purposes

Roof Maintenance Basics

A roof mostly fails at its weak points, like flashing seams, valleys, and penetrations, rather than across its whole surface at once. Maintenance is about protecting those points before small problems become tear-off-sized ones.

  • Clear gutters and downspouts at least twice a year (spring and fall), more often under heavy tree cover
  • Trim overhanging branches back at least a few feet. They scrape shingles in wind and drop debris that holds moisture
  • Remove moss and debris promptly rather than letting it accumulate through a full season
  • Schedule a professional inspection twice a year and after any major storm, even if nothing looks obviously wrong

What Does a New Roof Cost?

National averages for a full asphalt-shingle roof replacement land somewhere between $8,500 and $12,000 for a typical single-family home, though quotes commonly range from roughly $5,500 on the low end to $14,000 or more depending on size, material, and region. cross-check against 2–3 current national cost aggregators before publishing — this range moves with material and labor pricing and shouldn’t be presented as fixed.Premium materials push well past that: metal, tile, and slate roofs regularly run $20,000–$50,000+ on the same size home.

Cost DriverWhy It Matters
MaterialBiggest swing factor: asphalt vs. metal vs. slate can mean a 5–10x difference
Roof size (in squares)Priced per 100 sq. ft.; a 2,000 sq. ft. home often has 2,200–2,600 sq. ft. of actual roof surface once pitch is factored in
PitchSteeper roofs cost more per square: slower installation, more safety gear needed
Tear-offRemoving existing layers (and disposing of them) adds cost beyond a straightforward overlay
RegionLabor rates and material shipping costs vary significantly by market
Roof complexityValleys, dormers, and chimneys all add labor and flashing material

For a number specific to your home, use the Roof Replacement Cost Estimator. It accounts for size, material, and pitch instead of relying on a single national average.

Roof Permits and Insurance: What to Know

Permits. Most jurisdictions require a permit for a full roof replacement, though rules vary by city and county; some exempt like-for-like repairs under a certain size. A licensed roofing contractor typically pulls the permit as part of the job; if a contractor tells you a permit “isn’t needed” for a full tear-off, that’s worth double-checking independently before you sign.

Insurance claims. Storm and hail damage are usually covered under standard homeowners policies, but wear-and-tear and age-related failure typically aren’t. If you suspect storm damage: photograph everything before any repairs happen, get an independent roof inspection (not just the insurer’s adjuster), and get repair estimates in writing before accepting a settlement. Filing too fast, before documenting the damage, is one of the most common reasons claims get underpaid.

Choosing a Roofing Contractor

  • License and insurance: confirm both general liability and workers’ compensation coverage, not just a business license
  • Local track record: recent reviews from your specific area, not just an aggregate star rating
  • Written, itemized estimate: material brand and line, tear-off scope, disposal, and timeline should all be spelled out, not bundled into one number
  • Warranty terms: manufacturer warranties (materials) and workmanship warranties (installation) are separate. Ask for both in writing, and check how long the workmanship warranty actually runs
  • Payment structure: be cautious of any contractor asking for full payment up front, before materials are delivered

Frequently Asked Questions

How do I know how old my roof is? Check your home’s purchase disclosures, permit records with your local building department, or (for asphalt shingles) look for a manufacture date code stamped on the underside of a shingle tab.

How long does a roof usually last? It depends entirely on material: 15–20 years for basic asphalt, 25–30 for architectural shingles, and 40+ years for metal, tile, or slate. Climate and ventilation quality shift these ranges in both directions.

How many layers can a roof have before it needs a full tear-off? Most building codes cap it at two layers of asphalt shingles; beyond that, the extra weight and heat retention become a structural and warranty concern.

What’s the difference between a “low-slope” and “steep-slope” roof? Low-slope generally means under 4/12 pitch and requires membrane roofing (TPO, PVC, EPDM) instead of standard shingles. Steep-slope starts around 7/12 and can use any standard material.

Can you put a new roof over an old one? Sometimes. It’s called an overlay, and it’s cheaper than a tear-off. But it only works over a single existing layer in reasonable condition, and it hides the decking, so any existing rot goes undetected until the next replacement.

How often should a roof be inspected? Twice a year as routine maintenance, plus immediately after any hailstorm, major wind event, or fallen tree limb.
How to Build a DIY Mow Strip Under Your Fence

How to Build a DIY Mow Strip Under Your Fence

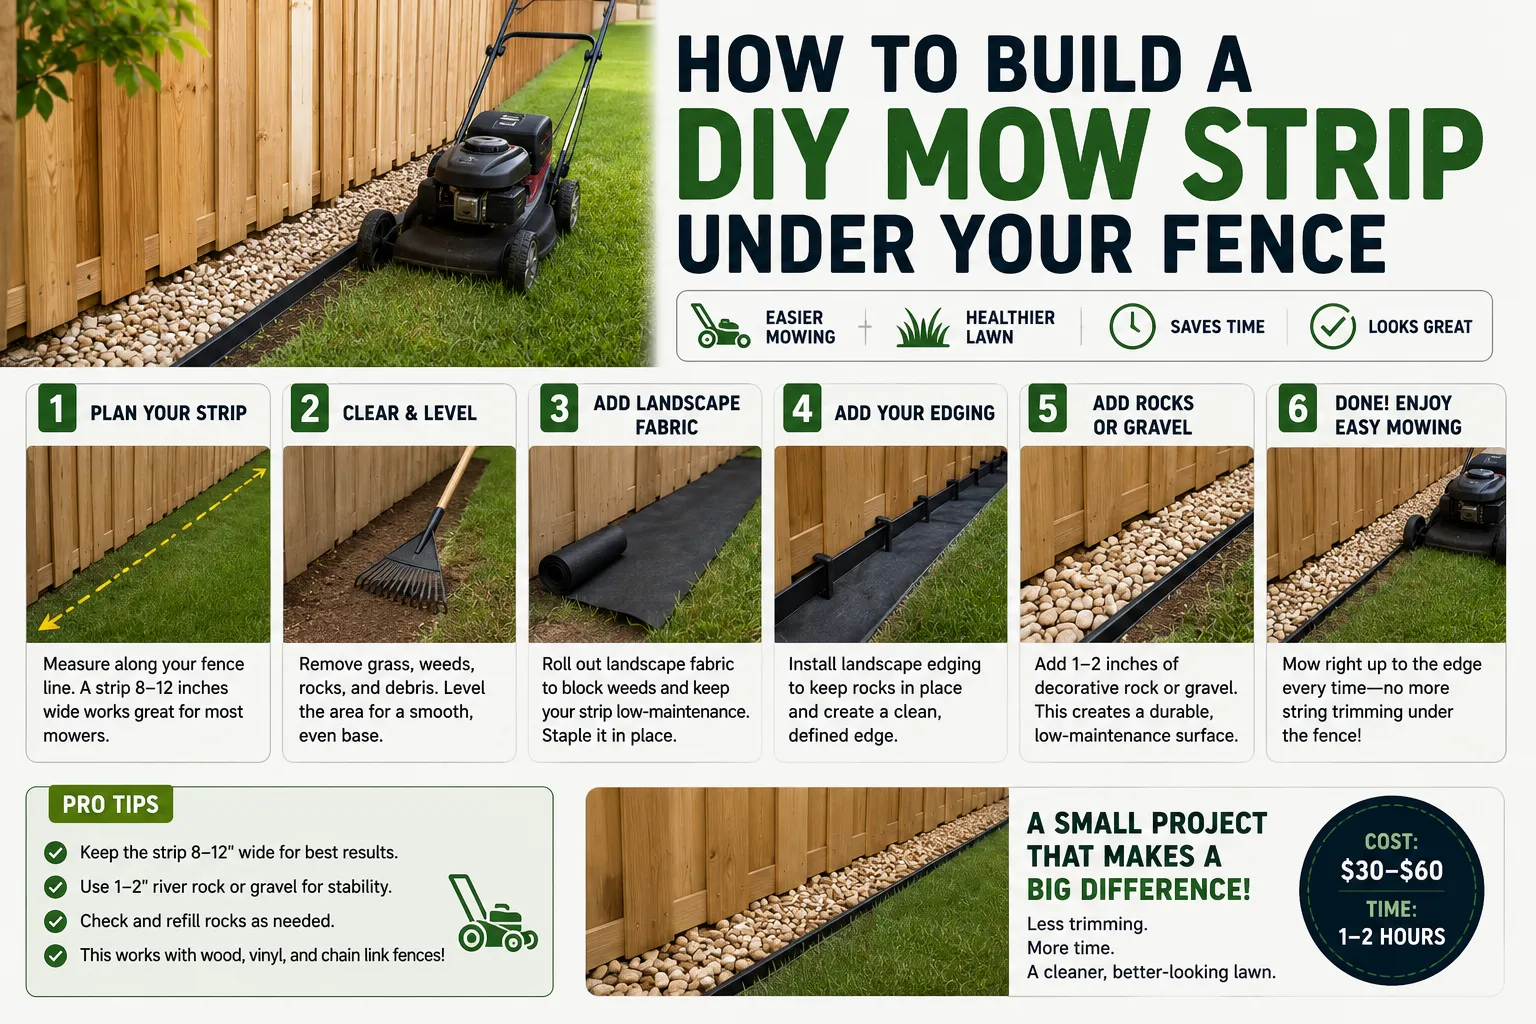
A mow strip is a narrow band of concrete, pavers, or gravel set flush with the ground along the base of a fence. It gives your mower’s wheel a place to ride so the blade reaches all the way to the fence line, no string trimmer required. Most residential strips run 6 to 12 inches wide and 3.5 to 4 inches deep.

That’s the short version. The long version is that a fence line is one of the worst spots in your yard to mow, and most people don’t realize it until they’ve replaced a string trimmer head for the third time this season.

What Is a Mow Strip and Why Put One Under a Fence?

A mow strip does three jobs at once. It stops grass and weeds from growing up against the fence where a mower can’t reach. It keeps your trimmer line away from posts and pickets, which is the number one cause of chewed-up fence bottoms. And if you’ve got a dog that likes to test the perimeter, a buried strip actually stops them, rather than just slowing them down.

Under a fence specifically, a mow strip also protects wood and vinyl fencing from constant ground moisture and mower-blade nicks right at the base — usually where fence rot and cracking start first.

How Wide and Deep Should a Mow Strip Be?

Most mow strips run 6 to 12 inches wide and 3.5 to 4 inches deep. The right number for your yard depends on your mower, and oddly enough, on what your fence is made of.

  • 6 inches is the functional minimum. It fits one mower wheel and nothing else — fine for a push mower, tight for anything wider.
  • 8 inches is the sweet spot for most homes: comfortable tracking for a standard rotary mower without wasting material.
  • 10–12 inches suits a wide-deck or riding mower, and doubles as a narrow walkway along the fence. At this width, add reinforcement — a single run of #3 rebar, or fiber mixed into the concrete, keeps the slab from separating at its cracks.

Depth matters less for looks and more for how long the thing lasts. Go 3.5 to 4 inches for concrete, and dig your trench 4 to 6 inches deep to leave room for a compacted base underneath.

One exception worth knowing before you pick a width: if you’re running Trex, composite, or cedar fencing, keep the strip no wider than the post itself. Those materials expand and contract with temperature more than chain link or standard wood, and a strip wider than the post will eventually crack under that seasonal movement.

Best Materials for a DIY Mow Strip

Concrete gets most of the attention because it lasts the longest. It’s not the only option, and it’s definitely not the cheapest.

MaterialTypical DIY CostInstall DifficultyLifespanWeed-Blocking
Concrete (poured)$2–$5/linear ft, materials Moderate–High20–30+ yearsExcellent
Pavers or brick$10–$20/linear ft, installed Moderate15–25 yearsGood
Gravel + edging$0.50–$2/linear ft, materials Low5–10 yearsFair
Rubber/plastic/metal edging$1.50–$4/linear ft, installed Low5–15 yearsPoor–Fair
HDPE mow strip panel~$5/linear ft Low15–20 yearsGood

Concrete wins on lifespan and weed-blocking, full stop. It’s also the most work: forms, mixing, screeding, curing. Gravel is the opposite end — cheapest and fastest, but it needs a fabric underlayment to block weeds at all, and even then, wind-blown seed finds its way into the gaps within a couple of seasons.

Pavers land in the middle. They often cost more than concrete per foot, which surprises people, but they don’t need curing time and a cracked paver is a one-piece swap instead of a jackhammer job. If you’d rather not mix a single bag of concrete, an HDPE panel product gets you most of concrete’s weed-blocking without the forming and pour. You’re trading some lifespan for a Saturday afternoon instead of a weekend.

What Does a DIY Mow Strip Cost?

For a typical 50-foot run at 8 inches wide and 4 inches deep, bagged concrete materials (including forms and base) run roughly $100 to $250 . Add another $30 to $60 if you don’t already own a float, edger, and jointing tool. Hire it out instead and the math changes: contractors typically price small flatwork like this at $8 to $15 per linear foot, but many apply a minimum job charge of $800 to $1,500 regardless of exact footage, since a 50-foot mow strip usually isn’t worth a separate trip at the per-foot rate alone .

Rather than eyeballing the concrete math — an 8-inch by 4-inch strip uses about 0.022 cubic yards per linear foot, which isn’t a number anyone keeps in their head — plug your strip’s length, width, and depth into our Concrete Price Calculator. It converts straight to cubic yards and bag count, so you know exactly how many 80-lb bags to load into the cart before you’re standing in the aisle doing math on your phone.

How to Install a Mow Strip While Building a New Fence

Building the strip alongside a new fence is the easier of the two jobs. You’re not excavating around anything that’s already load-bearing.

  1. Mark your width before you dig anything. Use the fence-type guidance above to pick 6, 8, or 12 inches, and mark the line with spray paint or a taut string.
  2. Set fence posts first, dig the strip trench second. Let post concrete cure per the fence manufacturer’s timeline before you trench next to it — digging too soon can shift a post that hasn’t set.
  3. Trench 4 to 6 inches deep at full strip width. Pull every root you find. A missed root is the single most common reason a DIY strip heaves within its first year.
  4. Set forms 2 inches wider than the fence line. 1×4 lumber staked every 3 to 4 feet works fine for straight runs. That small overhang keeps the mower wheel from ever catching the post itself.
  5. Add base material and reinforcement. Compact a gravel base, and if you’re going 10 to 12 inches wide or working in clay soil, lay a single run of #3 rebar before you pour.
  6. Pour, screed, and pitch away from the fence. Slope the surface about 1/8 to 1/4 inch across its width so water runs off the strip instead of pooling at the post base.
  7. Cut control joints and cure. Tool a joint every 4 to 6 feet, about a quarter of the slab’s depth. Keep it damp for 3 to 7 days, and hold off mowing over it for a full week.

One thing worth doing while the trench is open and nothing’s built yet: if you’re planning path or landscape lighting along that fence line eventually, sleeve a length of PVC conduit under the strip now. Digging it up later to add wiring is a much bigger job than laying a $10 pipe today. If lighting’s on the list, our General Lighting Calculator can help you plan fixture spacing before you decide how much conduit to bury.

How to Install a Mow Strip Under an Existing Fence

This is the version most people actually need, and it’s the one almost nobody online walks you through — because you’re excavating right next to posts that are already carrying a fence.

  1. Work in short sections, not the full run at once. Dig 3 to 4 feet at a time. Trenching the entire length in one pass is how you undermine a footing you didn’t mean to touch.
  2. Hand-dig within 6 inches of every post. Once you’re close, put the power auger or trencher away. A shovel and a trenching spade are slower, but a machine is how existing footings crack.
  3. Lean toward pavers or gravel near posts, concrete everywhere else. A full concrete pour tight against an existing footing risks bonding to it in ways that transmit stress back and forth as the ground moves. Pavers or a gravel-and-edging combo let you retrofit without that risk.
  4. Butt the material to the post — don’t bond it. Leave a small gap, or run a flexible sealant where the strip meets the post, so seasonal ground movement doesn’t crack your new strip against something that isn’t moving with it.

Chain Link

Chain link is the easiest retrofit by a wide margin. Posts sit in individual footings spaced further apart than a wood or vinyl fence, which leaves more open trench to work in between and less post to dig carefully around. The mesh itself doesn’t need special treatment — just make sure the strip sits flush so the bottom of the mesh isn’t digging into loose soil.

Wood Privacy or Picket

Check what’s already around the post before you dig. Older wood fences often have a gravel or concrete collar buried at the base that isn’t obvious until your shovel hits it. Watch your depth against the bottom rail, too: most privacy fences are built with a few inches of clearance between the bottom rail and the ground specifically to keep wood off wet soil. Bring your strip up too high and you erase that gap, trading one rot problem for another.

Vinyl

Vinyl posts are hollow and set in a smaller concrete footing than wood, but the real issue is the same one CFC Fences & Decks flags for composite fencing: vinyl expands and contracts more than wood or chain link with temperature swings. Keep the strip no wider than the post face, and put a flexible expansion joint where the two meet. Skip that step and hairline cracks tend to radiate out from the post within a season or two.

Will a Mow Strip Stop Weeds — and Keep Dogs From Digging?

A solid material stops weeds far better than gravel does. Concrete, tightly fitted pavers, and interlocking HDPE panels all form a continuous barrier; gravel needs a fabric underlayment just to compete, and even then, wind-blown seed germinates in the gaps between stones within a couple of seasons. If you want to know exactly what’s growing back before deciding how hard to fight it, Cornell’s Turfgrass and Landscape Weed ID tool is a free, genuinely useful resource for narrowing it down.

On the digging question: a strip buried 4 to 6 inches deep is a real barrier. Most dogs dig along a fence line because they can feel or see a gap to the other side at ground level, so the digging tends to be targeted at that one spot rather than scattered across the yard. Remove the gap and most dogs give up within their first few attempts, though a truly determined digger can still work around the ends of a strip that doesn’t run the full fence length.

Preventing Cracks and Long-Term Maintenance

Some hairline cracking in a concrete mow strip is normal, especially through a freeze-thaw winter. Control joints don’t prevent cracking — nothing outside a structural footing does — they just decide where the crack happens instead of leaving it to chance. Space them every 4 to 6 feet and you’ll rarely notice the cracks that do form.

Beyond that, maintenance is minor. Reseal every few years if you want to keep the color from fading. Keep an eye on nearby tree roots, which can lift a strip from underneath over several years no matter how well you built it. And if a section does crack badly, a concrete or paver strip is a patch job, not a full teardown — you’re replacing a few feet, not the whole run.

FAQ

How wide should a mow strip be?

Most residential mow strips run 6 to 12 inches. Six inches is the functional minimum for one mower wheel; 8 inches works for most homes; go 10 to 12 inches if you run a wide-deck or riding mower.

Can I install a mow strip after the fence is already built?

Yes. It’s more work than building it alongside a new fence, since you’re excavating around existing footings, but it’s a standard retrofit. Work in short sections, hand-dig near posts, and follow the retrofit steps above for your specific fence type.

Does a concrete mow strip need rebar?

Not always. It’s optional on a 6- to 8-inch strip. On 10- to 12-inch widths, or if you’re working in heavy clay soil, a single run of #3 rebar (or fiber mixed into the concrete) is cheap insurance against the slab separating at its cracks.

What’s the cheapest DIY mow strip material?

Gravel with a fabric underlayment and basic edging is the least expensive option up front, though it needs replenishing every few years and blocks weeds less effectively than a solid material.

Will it crack in freezing weather?

Some hairline cracking is normal in freeze-thaw climates. Properly spaced control joints won’t stop it entirely, but they control where it happens, so the strip stays functional and mostly invisible even after a few winters.

Continuous Fence Panels: Types, Costs & Install Guide

Continuous Fence Panels

Picking a fence for a pasture, arena, or property line usually comes down to one question: how much time do you want to spend maintaining it later? Continuous fence panels answer that by replacing individual rails and posts with pre-built sections that connect end to end in a straight, uniform line. Here’s what they’re made of, what they cost, and how to put them up yourself.

What Are Continuous Fence Panels?

Continuous fence panels are pre-welded steel fence sections, usually 20 feet long, that connect end to end along posts to form one uniform barrier without individual pickets in between. Each section attaches directly to a post at both ends, so a 200-foot fence line needs about 10 panels instead of dozens of separate rails and pickets.

How They’re Different From Cattle Panels, Cable Fence, and Pipe Fence

Cattle panels are the closest relative, but they’re typically shorter (around 16 feet), built as a welded wire grid rather than horizontal rails, and better suited to hogs, goats, and garden use than large livestock or long fence runs. Cable fence uses tensioned steel strands between posts. It looks clean when it’s new, but the cables stretch over time and need periodic retensioning to stay tight. Pipe fence is the heaviest-duty option: individual pipes welded on site into a custom structure. It’s strong and permanent, but the labor cost is high since nothing arrives pre-built.

Continuous panels sit in between. They’re factory-built like cattle panels, use horizontal rails like pipe fence, and don’t stretch or need retensioning the way cable does.

Types of Continuous Fence Panels

4-Rail vs. 5-Rail vs. 6-Rail (and 3–7 Bar Options)

Rail count doesn’t change the height of the finished fence. Every standard panel ends up around 5 feet tall once installed roughly a foot off the ground. What changes is the spacing between rails.

4-rail panels have the widest gaps and the most open sightline. They’re the lightest option, usually the cheapest, and work well for cattle and horses in open pasture where you don’t need to stop smaller animals from slipping through. 5-rail panels are the middle ground and the most common configuration sold, since the tighter spacing handles mixed livestock without adding much weight or cost over a 4-rail panel. 6-rail panels (and 7-bar panels from some suppliers) close the gaps further. These are the right call for goats, sheep, foals, or any high-pressure spot like an alley or crowding pen where an animal might try to push through or under a wider-spaced rail.

Steel Gauge, Galvanizing & Powder-Coat Finish

Most panels use 14-gauge steel tubing for the horizontal rails, around 1-1/4 inches in diameter, with thinner solid rod verticals spaced along the panel for rigidity. Finish is the other variable worth checking before you buy:

  • Galvanized: a zinc coating that resists rust without repainting. This is the standard choice for most climates and the safest default if you’re not sure which finish to pick.
  • Powder-coated: a thicker, more scratch-resistant finish, usually found on premium product lines and priced a bit higher.
  • Bare or painted steel: the cheapest option up front, but it needs more attention over time since paint chips and bare steel rusts faster than a galvanized coating.

Standard Sizes and Specifications

Panel Length: 20 ft vs. 24 ft

Twenty feet is the length nearly every manufacturer standardizes on, mainly because it’s a length one or two people can lift and position without a tractor or forklift. Twenty-four-foot panels exist and cover more ground per joint, but they’re noticeably heavier per panel and mostly show up on large commercial jobs where fewer connection points matter more than ease of handling.

Panel Height and Rail Spacing

The standard installed height across the market is 5 feet, reached by setting the panel about a foot above grade. Here’s how rail count maps to spacing and use case:

Rail CountRail SpacingBest For
4-RailWidest gapsCattle, horses, open pasture
5-RailBalancedMixed livestock, general-purpose fencing
6-RailTighter gapsSmall livestock, high-traffic pens
7-Bar+Tightest gapsBucking stock, high-pressure containment

Benefits of Continuous Fence Panels

The biggest advantage shows up over time, not on install day. Wire fencing needs periodic retensioning as it stretches and settles; a welded continuous panel doesn’t stretch, so it won’t sag or need that maintenance cycle. Since each panel is a single rigid piece, the whole fence line holds a straighter, more uniform look than wood or wire ever will, especially once you’re a few years past installation.

Strength is the other factor. A welded steel panel handles the weight of a leaning or pushing animal better than a strand of wire, which is one reason continuous panels are the default choice around cattle. The trade-off is upfront cost: continuous panels typically cost more per linear foot than wire fencing, though the lower long-term maintenance often closes that gap over a few years.

Best Uses for Continuous Fence Panels

Pastures and cross-fencing are the most common application, since the panels hold up to daily animal contact without the year-over-year sagging that wire develops. Riding and roping arenas are another strong fit; the clean, uniform rail line gives spectators and timers an unobstructed sightline that wire or wood rail can’t match. Perimeter and property-line fencing works well too, particularly where you want a finished look along a road frontage.

For containment specifically, cattle and horses are the two animals continuous panels are built around, though the tighter 6-rail and 7-bar configurations extend that to goats and sheep. Some suppliers also sell free-standing versions, meant for portable corrals or temporary pens where you don’t want to set permanent posts at all.

How Much Do Continuous Fence Panels Cost?

Price by Rail Count

Expect to pay somewhere between $125 and $180 for a standard 20-foot panel, with price scaling up alongside rail count and finish quality. As one published example, Seven Peaks Fence and Barn lists 4-rail panels at $129, 5-rail at $153, and 6-rail at $177 per 20-foot section as of 2026. Treat those figures as a ballpark rather than an industry average since pricing shifts with regional steel costs and supplier margins.

Rail CountApprox. Price (20-ft Panel)
4-Rail$125–$135
5-Rail$145–$155
6-Rail$170–$180

That per-panel price is only part of the budget. Posts, concrete for corner and gate posts, gate hardware, and freight all add to the total, and freight tends to be the number people underestimate: steel panels this heavy usually ship by freight carrier on a flatbed rather than standard parcel, which can add a meaningful amount to a large order.

How to Install Continuous Fence Panels

Installing continuous fence panels doesn’t require welding, and one person can do it with the right prep.

Tools You’ll Need

A post hole digger or auger, a level, a tape measure, a string line for keeping the run straight, manufacturer clips or self-drilling screws with a driver, and jack stands or a second set of hands to hold panels upright while you fasten them.

Step-by-Step Installation

  1. Run a string line along the planned fence path to keep every post aligned.
  2. Set corner and gate posts first, and sink them deeper (ideally in concrete) since they carry the tension of the whole line.
  3. Set line posts at 20-foot intervals to match your panel length.
  4. Stand the first panel against its posts, using jack stands to hold it level while you work.
  5. Attach the panel to each post with the clips or screws the manufacturer provides.
  6. Move to the next panel and repeat, checking the string line as you go.
  7. Cap the posts once the run is complete.
  8. Walk the full line to check for square and level before backfilling or setting the final post in concrete.

Do You Need to Weld? (Clips vs. Welding)

No. Most continuous panels install with clips or self-drilling screws, which is standard practice and holds up fine under normal pressure. Welding is an option if you want a permanent connection and already have the equipment, but it adds labor most DIY installs don’t need, and it makes swapping out a damaged panel later much harder.

How Many Continuous Fence Panels Do You Need?

The math is simple for a straight run: divide your total linear footage by 20 (the standard panel length) and round up. A 200-foot fence line needs 10 panels. Add extra panels for any corners the line turns through, and plan for a gate frame instead of a panel wherever you need an opening, since gates are sized and sold separately from standard panels.

That hand calculation works fine for a short, straight stretch. It gets tedious fast once you’re factoring in corners, gates, and uneven ground on a longer run, which is exactly the kind of math a dedicated calculator handles faster and with fewer mistakes: enter total footage and rail count, and get back panel count, post count, and a rough cost estimate in one step.

Frequently Asked Questions

What are continuous fence panels? Pre-welded steel fence sections, typically 20 feet long, that connect end to end along posts to form a continuous barrier without traditional in-between pickets. They’re most common in agricultural fencing but also used for perimeter and arena fencing.

How long is a standard continuous fence panel? Twenty feet is the industry standard. Some suppliers offer 24-foot panels for large commercial runs, but they’re heavier and harder for one or two people to handle without equipment.

How many rails does a continuous fence panel need? Most panels come in 4-rail, 5-rail, or 6-rail configurations, and some suppliers go up to 7-bar. More rails means tighter spacing between rails, not a taller fence, since the finished height stays around 5 feet regardless of rail count.

How much do continuous fence panels cost? A standard 20-foot panel typically runs $125 to $180 depending on rail count and finish, not counting posts, gates, or freight. Heavy steel panels usually ship by freight carrier rather than standard parcel, which can add significantly to the total.

Do you need to weld continuous fence panels? No. Most panels install with manufacturer-supplied clips or self-drilling screws, and one person can put them up with a string line and jack stands. Welding is an option for a permanent connection but isn’t required.

How far apart should posts be for continuous fence panels? Since each panel spans 20 feet on its own, posts generally go at each panel end, roughly every 20 feet along a straight run. Corner and gate posts need to be set deeper, ideally in concrete, since they carry the tension of the whole line.

Are continuous fence panels good for cattle? Yes. Continuous panels are one of the most common fencing choices for cattle, since the rigid rail structure holds up to a large animal leaning or pushing on it better than typical wire strand fencing does.

How many panels do I need for my fence? Divide your total linear footage by 20 (the standard panel length) and round up, then add extra for corners and account separately for any gate openings. A fence panel calculator handles this in one step, and factors in posts and rough cost at the same time.

The Bottom Line

Continuous fence panels trade a bit of upfront cost for a fence that goes up faster and stays straight for years without the sagging and retensioning wire fencing needs. Whether it’s a 4-rail run across open pasture or a 6-rail setup around a high-traffic pen, the panel count and post count come down to simple math once you know your total footage. Run the numbers with a continuous fence panel calculator before you order, so the count matches the job on the first try.

ToolCalcPro Footer Preview