
That old patio is cracked. The garage floor looks rough. You’re wondering if you can pour a fresh layer of concrete on top and skip the messy demo work entirely.
The short answer is yes — but with real conditions attached. Skip those conditions and you’ll end up with two layers of failing concrete instead of one. Get them right, and a new overlay can add decades to a slab that looked like it was heading for the skip.
Here’s exactly when it works, when it doesn’t, what thickness and preparation you need, and how to handle an asphalt base if that’s what you’re working with.
Can You Pour Concrete Over Concrete? The Short Answer
Yes, you can pour new concrete over existing concrete — provided three conditions are met: the existing slab is structurally sound, the new layer is at least 2 inches thick, and a bonding agent is used to fuse the two layers together. Skip any one of these and the overlay is likely to fail.
The new layer depends entirely on the old slab for support. If the original concrete has active cracks, settlement, or structural weakness, those problems transfer straight through to the new surface — usually faster than you’d expect.
Think of it like painting over a wall with peeling plaster. The new coat can look great for a few months, but without fixing what’s underneath, you’re just delaying the same problem.
When Concrete Over Concrete Makes Sense
Pouring an overlay makes sense when you’re dealing with surface-level deterioration — scaling, spalling, minor surface cracks — rather than structural failure. The concrete underneath still needs to be doing its job; you’re just renewing the top layer.
Signs Your Existing Slab Passes the Test
Walk the slab and look for these green lights before you commit:
- No active cracking. Hairline cracks that have been stable for years are usually fine once repaired. Wide cracks, or cracks that are still growing, are a red flag.
- No soft spots or hollow sections. Tap the surface with a hammer. A dull thud instead of a sharp ring points to delamination or voids beneath the surface.
- Level and draining. If water pools on the slab, that drainage problem needs solving before you add another layer on top — not after.
- No tree roots underneath. Roots will keep pushing regardless of what’s above them, and a new concrete layer won’t slow them down.
If the slab passes these checks, you’re a solid candidate for an overlay according to DCPU1’s guide on adding concrete to existing slabs.
Bonded vs. Unbonded Overlays — Which One Do You Need?
There are two methods, and choosing the right one depends on your slab’s condition.
A bonded overlay chemically adheres the new concrete to the existing surface using a bonding agent. It works for thinner layers — typically 1.5 to 2 inches — on a stable, solid base. This is the method most DIY projects use, and it’s the right call when your existing slab is fundamentally sound.
An unbonded overlay sits on top of a separation layer (usually polyethylene sheeting or a thin sand layer) rather than bonding to the existing slab. Bulletproof Concrete explains that unbonded overlays must be at least 4 inches thick because they can’t borrow structural strength from the slab below. They’re the right choice when the original concrete has significant but stable deterioration — enough to make bonding unreliable, but not enough to justify full removal.
For most homeowners tackling a patio, driveway, or garage floor, a bonded overlay is the practical path — as long as the base slab is sound.
When You Should NOT Pour Over Old Concrete
There are situations where no amount of surface prep will save an overlay. Knowing these before you start saves you money and avoids doing the job twice.
Structural Problems That Require Full Demo
If your slab has heaved, settled unevenly, or has cracks wide enough to fit a coin into, the underlying cause hasn’t been addressed — it’s just been buried. According to Xcelent Concrete, structural problems in the original slab will reliably surface through any overlay you apply on top.
Common culprits include a poorly compacted subbase, water erosion beneath the slab, and tree root intrusion. None of these problems get better with a new layer on top. They get worse, and now you have twice as much concrete to remove.
Height Clearance Issues
Adding 2 inches of concrete means raising the floor level by 2 inches. That’s often enough to prevent a garage door from opening fully, create a tripping hazard at a threshold, or push a step height outside of building code.
Measure your clearances before you commit. If the math doesn’t work with your doorways, transitions, and adjacent surfaces, a full demo and repour at the correct height is the right call.
Freeze-Thaw Climates and Poor Drainage
In climates that experience repeated freeze-thaw cycles, water trapped between layers becomes a serious structural problem. SealGreen’s analysis of expansion joints explains that water infiltrating concrete joints expands during freezing, causing chipping, heaving, and cracking far faster than it would in a warmer climate.
If your existing slab drains poorly and you’re dealing with cold winters, solve the drainage problem first. Pouring over it just seals the water in and accelerates the damage.
How to Pour Concrete Over Existing Concrete — Step by Step
If your slab passed the inspection above, here’s how to do the job correctly.
Step 1 — Inspect and Repair the Old Slab
Fill any cracks with a concrete patching compound and let each repair cure fully before you move forward. MudMixer’s overlay preparation guide recommends repairing even minor surface damage at this stage — small problems become larger ones once they’re sealed under a new layer.
Give repairs a minimum of 24 hours to cure. Rushing this step is one of the most common reasons overlays fail early.
Step 2 — Clean and Profile the Surface
A bonding agent can’t grip a dirty surface. Pressure wash the entire slab and scrub away any oil, grease, curing compound residue, or paint. Let it dry completely before moving on.
For best adhesion, the surface also needs texture — a process called profiling. A wire brush or angle grinder works for smaller areas; shot blasting is faster for larger slabs. The goal is to open up the concrete’s pores so the bonding agent has something to anchor to.
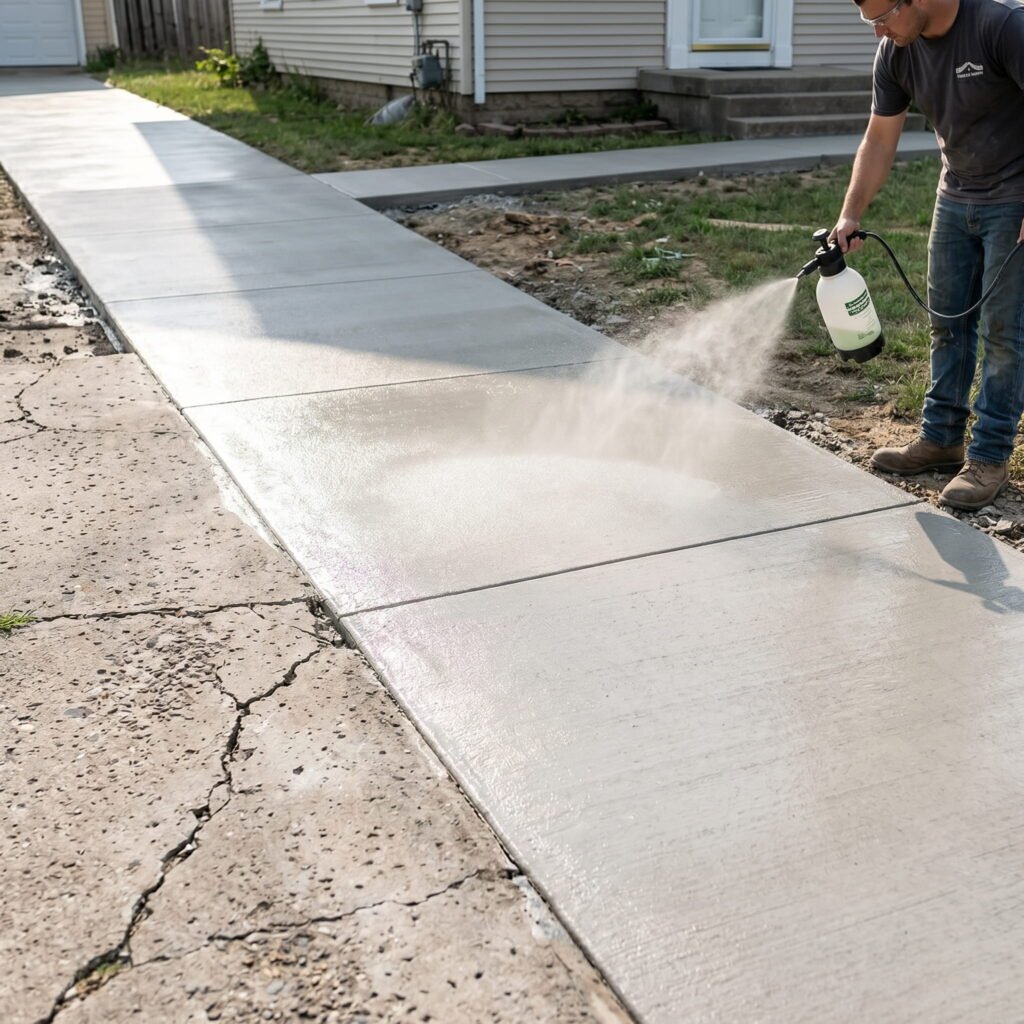
Step 3 — Apply a Bonding Agent
This step is non-negotiable for bonded overlays. Fresh concrete won’t adhere to a cured concrete surface without chemical help.
ChemCo Systems’ technical specifications for epoxy bonding agents call for application at a minimum of 15 mils thickness across the full surface area, using a liquid epoxy in the 2,000–6,000 cps viscosity range. Pay close attention to the product’s open time — you must pour the fresh concrete while the bonding agent is still tacky. If it cures before the new concrete goes down, you’ll need to reapply.
Step 4 — Pour, Screed, and Finish
Mix your concrete to the right consistency, pour it onto the tacky bonding agent, and screed it level. Work in sections if you’re covering a large area, keeping the pour moving so no section has time to begin setting before the rest catches up.
Minimum thickness is 2 inches; going to 2.5 or 3 inches gives you meaningfully more durability, especially for driveways or areas that see vehicle traffic. Finish the surface as required — trowel smooth for interiors, broom finish for traction outdoors, or stamp for texture. Cure the new layer for at least 7 days using a curing compound or continuous wet-curing method.
Can You Pour Concrete Over Asphalt?
This question comes up most often with driveways. If you have asphalt and want to upgrade to concrete, you don’t necessarily need to rip the asphalt out first.
What Makes Asphalt a Different Problem
Concrete and asphalt don’t bond chemically, and asphalt has a natural flexibility that concrete lacks. As temperatures change, asphalt expands and contracts more than concrete does — which can cause the rigid new layer to crack along those movement lines.
Angi’s guide to pouring concrete over asphalt is clear on the base requirement: the asphalt must be structurally sound, with no soft spots, no widespread alligator cracking, and no spongy areas when you walk on it. A weak or deteriorating asphalt base cannot support a concrete overlay reliably.
Prep Steps Specific to an Asphalt Base
Clean the surface thoroughly and repair any damaged sections before you do anything else. For a stronger mechanical connection between materials, drill holes into the asphalt on a 12–18-inch grid and set rebar in each hole, leaving 2–3 inches protruding above the surface. The concrete locks around the rebar, compensating for the absence of chemical bonding between the two materials.
Pour at least 4 inches thick when going over asphalt — you need more structural depth since the asphalt base has less rigidity than a concrete slab would.
Frequently Asked Questions
How thick does the new layer of concrete need to be?
The minimum for a bonded overlay is 2 inches. Anything thinner creates a layer too brittle to handle consistent foot traffic or vehicle loads without cracking. For driveways, 3 to 4 inches is a more practical target. If you’re going the unbonded route — where a separation layer deliberately prevents adhesion — the federal standard per the FHWA calls for a minimum of 4 inches, since the overlay can’t share structural load with the slab underneath.
Do you need a bonding agent when pouring concrete over concrete?
Yes, in almost every case. Fresh concrete won’t stick to a cured concrete surface without a chemical bridge between them. Everything-About-Concrete explains that the smooth, sealed surface of cured concrete actively prevents adhesion. The only exception is an unbonded overlay, where you’re deliberately creating a separation layer — but for standard overlays, skipping the bonding agent is the single biggest reason DIY projects fail.
How long does a concrete overlay last?
A properly prepared and bonded concrete overlay can last 20 to 30 years with basic maintenance. The lifespan depends heavily on the condition of the base slab, your climate, and how thoroughly the surface prep was done. Overlays applied to compromised slabs or in harsh freeze-thaw climates tend to fail much sooner — often within 5–10 years — regardless of how well the top layer was poured.
How much does it cost to pour concrete over existing concrete?
Professional concrete resurfacing typically runs $3 to $10 per square foot, depending on location, slab condition, and the finish you want. Decorative overlays with stamping or staining push that to $7–$20 per square foot. HomeAdvisor’s 2025 cost data puts the national average around $1,600 for a standard driveway resurfacing project, though costs vary widely by region.
One DIY homeowner planning a 400 sq ft patio used ToolCalcPro’s Concrete Price Calculator to estimate material costs before calling contractors. Armed with an estimated $1,200 material cost, they spotted an inflated quote and negotiated it down by $800. Knowing the material baseline puts you in a far stronger position when comparing bids.
The Bottom Line
Yes, you can pour concrete over concrete — and it’s a cost-effective way to restore a slab without the expense and disruption of full demolition. The outcome comes down to one thing: the condition of what’s already there. A structurally sound, clean, well-prepped slab gives a new overlay a solid foundation. An already-failing slab just means two layers of problems to deal with later.
Before you call a contractor or price out materials, run the numbers. The Concrete Price Calculator at ToolCalcPro estimates material costs by project size, mix type, and regional pricing — so you go into contractor conversations knowing exactly what you should be paying.
Have questions about your specific slab or project? Drop them in the comments below.